• Skip to primary navigation
  • Skip to main content
  • Skip to primary sidebar
  • Skip to footer

Little Fish

  • Home
  • About
    • Work with Me
    • Contact
    • Disclosures
  • Crafts and Activities
    • Easy Arts and Crafts
    • Creative Play
    • Sea Themed Activities
    • Books and Activities

Disney Inspired Lightning McQueen Cupcakes

June 7, 2017 by Rosie 14 Comments

Lightning McQueen Inspired Cupcakes

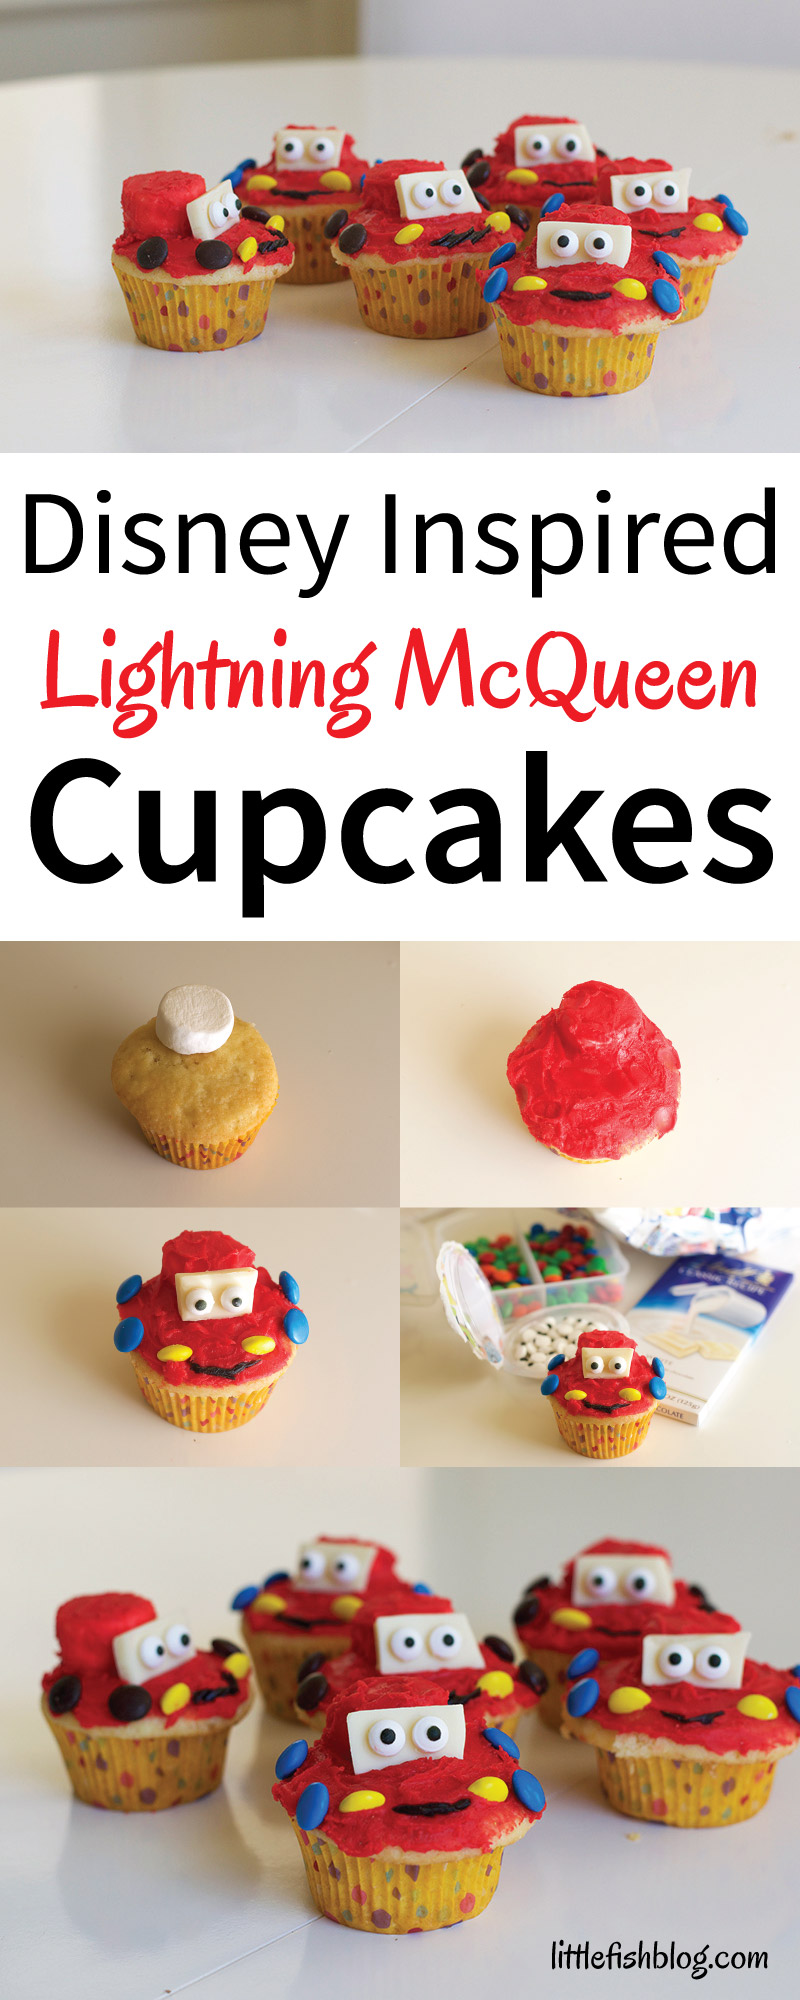
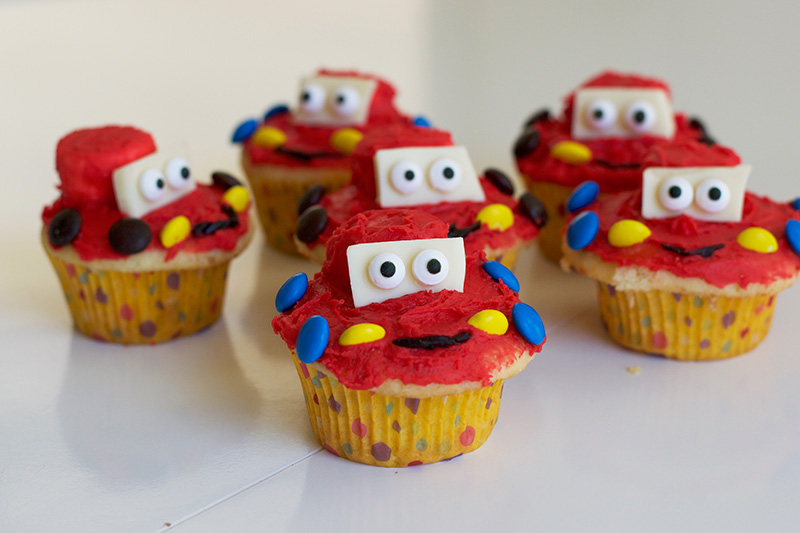
Today on the blog I am sharing these Disney inspired Lightning McQueen cupcakes.

Little M loves the characters from the Disney Cars movies. He got to know the characters long before he actually watched the first movie! His daddy got him a box of second hand cars from the movie when he was just 2 – since then he has loved playing and role playing with them. Of course when he eventually saw the movie, he was so excited that he knew all of the characters already!

Disclosure: Amazon affiliate links included. All opinions are my own.

Cars was the first movie we watched together as a family, so it will always be special. We made a big deal of having a ‘movie night’ – complete with snacks of course!

The newest movie Cars 3 comes out soon and we are now planning to take Little M for his first cinema visit.

To celebrate the release of the new movie I thought it would be fun to make some Disney inspired Lightning McQueen cupcakes! Everyone loves Lightning McQueen!

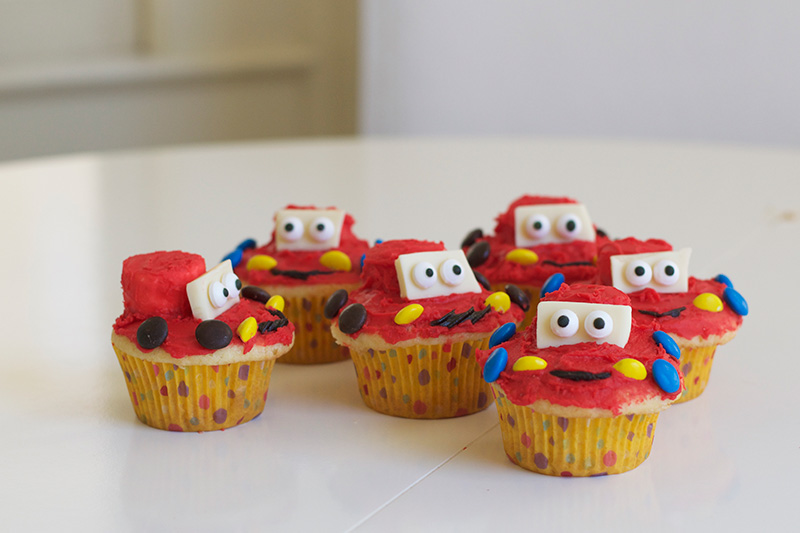
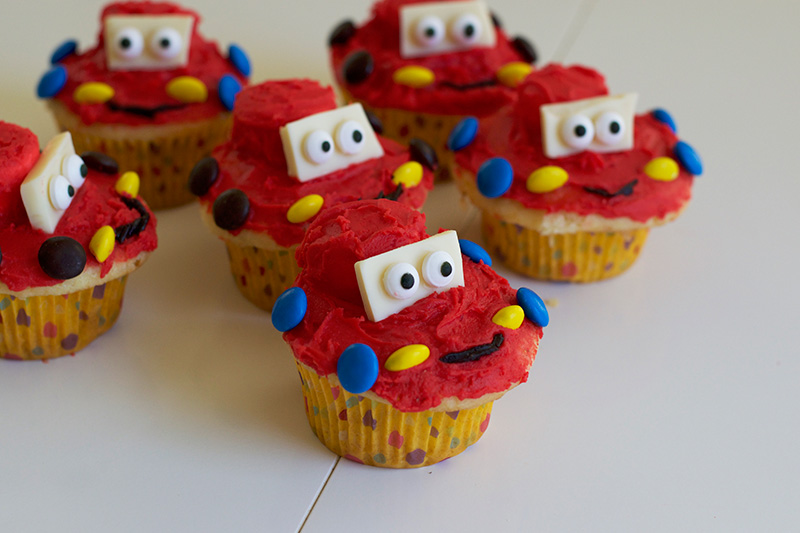
These cupcakes are super easy to make and would would be great for a Cars themed party. Or just for fun to have at home. You can make them with the kids, or surprise them!

You can use any cupcake recipe you like for these, or even use ready made cupcakes for a simple kids activity – just decorate. I’ve included the recipe we used for the cakes as they were so yummy! The Joy of Cooking is my favourite recipe book – the mixture is adapted from there.

Decorating the cakes is so quick and easy. I really don’t do complicated in the kitchen – do you?! I like to keep things as simple as possible, whilst also having a bit of fun. You can decorate these cakes really easily on your own, or with the kids and they still look fun and effective (and hopefully a bit like Lightning McQueen!)

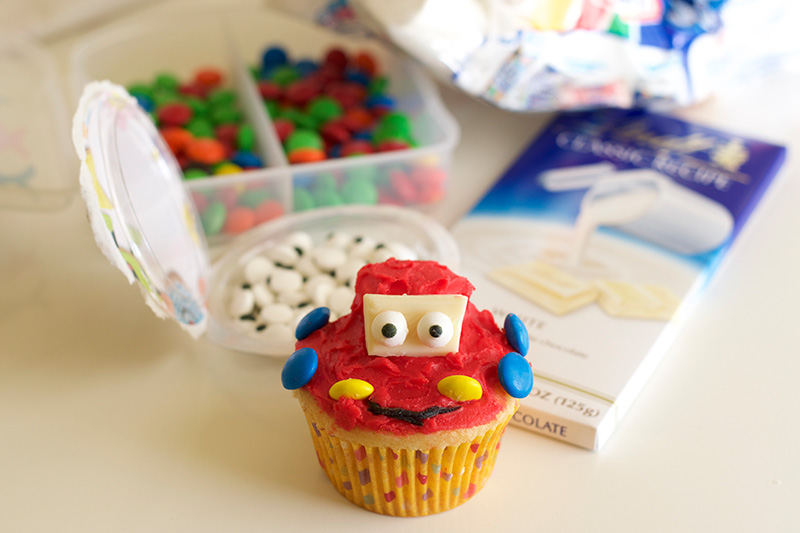
We used ready made icing for ease of use, but of course feel free to make your own. We used candy eyes, but you could also use chocolate chips.

You can substitute any of the decorations with alternatives. Or give the kids a handful and let them come up with their own design.

If you don’t have American style measuring cups, you should give them a try! So easy!

Print Recipe
Disney Inspired Lightning McQueen Cupcakes
These Disney inspired Lightning McQueen cupcakes are super easy to make and would would be great for a Cars themed party. Or just for fun to have at home!
Lightning McQueen Inspired Cupcakes
Prep Time 30 minutes
Cook Time 20 minutes
Passive Time 10 minutes
Servings
cupcakes
Ingredients
For the cakes
  • 1 cup sugar
  • 1/2 cup butter
  • 2 large eggs
  • 1 1/2 cups plain flour / all purpose flour
  • 1 1/2 teaspoons baking powder
  • 1/2 cup milk
  • 1 teaspoon vanilla essence
For the decoration
  • 1 pack large marshmallows
  • 2 tubes instant red icing Or you can make your own butter icing and add red food dye
  • 1 3.5 oz bar white chocolate We used Lindt chocolate for the nice rectangular shaped pieces
  • 1 pack candy eyes Or use chocolate chips instead
  • 1 pack m and m's
  • 1 pack black string liquorice Or use instant black icing with a narrow nozzle.
Lightning McQueen Inspired Cupcakes
Instructions
To make the cupcakes
  1. Have all of the ingredients at room temperature. Preheat the oven to 350°F / 180°C. Line a muffin or cupcake tin with 12 cupcake liners.
  2. Cream together the butter and sugar in a large bowl, until thoroughly blended.
  3. Add the eggs to the butter and sugar mixture and combine.
  4. Whisk together the flour and baking powder in another bowl.
  5. Gradually add the flour and the milk to the mixture, bit by bit. Whisk by hand or with an electric whisk for 1 1/2 minutes until thoroughly mixed.
  6. Stir well. Add the vanilla and stir again.
  7. Fill each of the cupcake liners around 3/4 full. This easily makes 12 cupcakes, or up to 16 if you fill them a little shallower.
  8. Bake for around 20 minutes, or until a tooth pick comes out of a cupcake clean.
  9. Cook in the tin for 10 minutes. Finish cooling on a cooling rack. Allow to cool completely before icing.
To decorate
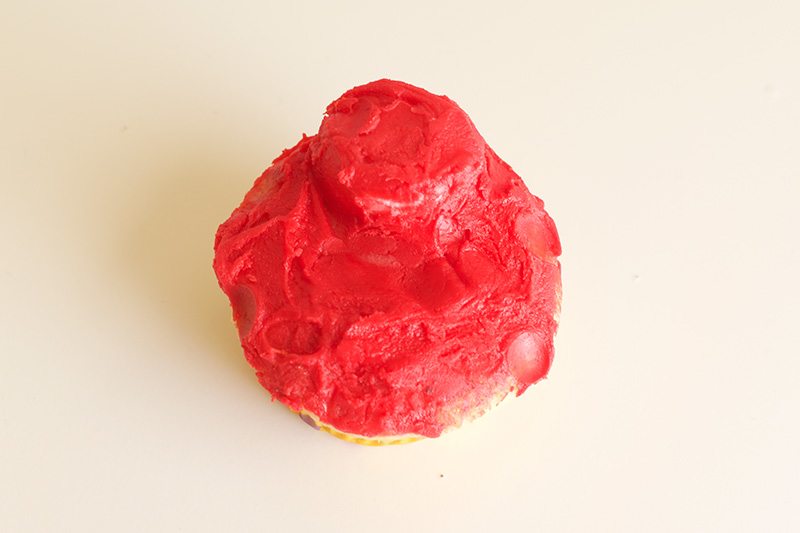
  1. Cut a marshmallow in half. Place one half of a marshmallow on top of a cupcake, just off the centre. Press gently.
  2. Cover in red icing. I just spread it on with a spoon - quick and easy!
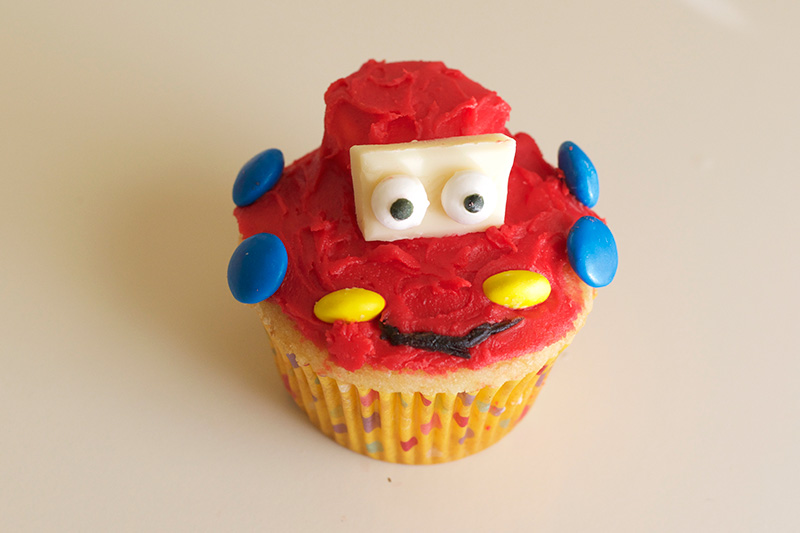
  3. Melt a few pieces of white chocolate in the microwave or in a glass bowl over a pan of boiling water. This is to stick the eyes on. Put the other rectangles of chocolate to one side.
  4. Dab a little melted white chocolate onto the back of two candy eyes using a small spoon. Stick the eyes onto one rectangle of white chocolate to make the 'windscreen'. Stick onto the cake in front of the marshmallow.
  5. Use the m and m's to add wheels and head lights. I cut yellow m and m's in half for the headlights.
  6. Add a smile using a small piece of string liquorice or some black icing.
  7. Enjoy! Yum!
Recipe Notes

Go ahead and substitute any of the candies with your own ideas!

Share this Recipe

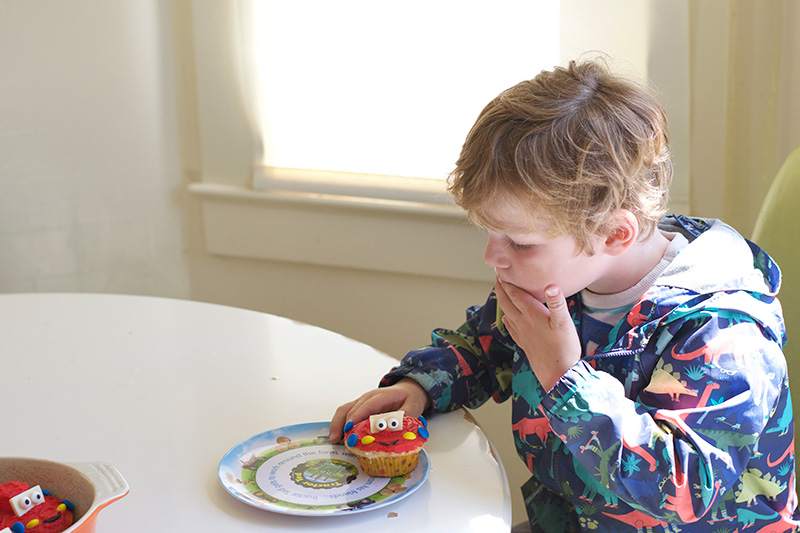
Little M loved the cupcakes! I surprised him with them and he had a go at making one of his own too. Now we are excited to see the movie!

I hope you like these Disney inspired Lightning McQueen cupcakes. If you like these you might like to check out some of my other easy recipe ideas.

Are you going to see the Cars 3 movie? Will you give these cupcakes a try?

Like this recipe idea? Pin me!


Filed Under: Crafts and Activities, Recipes

Quick Fro Yo with Mixed Berries and Oreos

May 10, 2017 by Rosie Leave a Comment

As you probably already know – we are big fans of fro yo in our family! Little M and LP can’t get enough of it. I’m always trying out simple ways of making quick fro yo, so I can whip up a healthy, but tasty dessert for the kids.

This quick fro yo recipe is made by hand, with no special equipment needed, except a blender. We used to have an ice cream maker and barely used it! I’m much more of a fan of recipes I can just throw together quickly and eat straight away – aren’t you?

Fro Yo never stays around long in our home anyway, so I don’t mind making quick little batches like this, without using an ice cream maker. Fro yo made by hand does tend to go a bit hard if left in the freezer too long, but that is solved by eating it as soon as it is ready! Or if you’d like to store it for longer, just remember to let it defrost and soften for 20 minutes before eating. It tastes just as yummy!

This quick fro yo is so easy, with only three ingredients that you’ll probably have handy. We nearly always have yoghurt in the fridge and frozen fruit in the freezer – I like that I can just throw this together an hour before dinner.

You can use regular plain yogurt, or greek yoghurt and use any mix of berries you fancy. We usually use a mix of blackberries, raspberries, strawberries and blueberries.

The Oreos are optional and a bit of a treat! I used chocolate ones, but of course you can use the ordinary ones. You could also try adding any other crumbled cookies, or some choc chips, or leave them out if you prefer. Feel free to experiment!

Print Recipe
Quick Fro Yo with Mixed Berries and Oreos
A super quick fro yo recipe, using only 3 ingredients. Perfect to whizz up an hour before dinner!
Prep Time 5 minutes
Passive Time 60 minutes
Servings
people
Ingredients
  • 2 cups plain yoghurt
  • 1 cup frozen mixed berries
  • 3 Oreo cookies
Prep Time 5 minutes
Passive Time 60 minutes
Servings
people
Ingredients
  • 2 cups plain yoghurt
  • 1 cup frozen mixed berries
  • 3 Oreo cookies
Instructions
  1. Whizz the yoghurt and the frozen fruit together in a blender, or in a bowl with a blender stick.
  2. Place mixture in a bowl. Cover and freeze for 20 minutes.
  3. Stir well, then freeze for another 20 minutes.
  4. Repeat the previous step by stirring for a final time and freeze for a final 20 minutes. Mixture should be thicker and semi frozen.
  5. Stir in some crumbled Oreos or your chosen treat.
  6. Serve with blackberries or other fruit on top - yum!
Recipe Notes

Try any mix of berries you fancy. You can also vary the cookies. Top with fresh fruit and more crumbled cookies!!

Share this Recipe

This quick fro yo went down almost as quickly as it was made! Both my two loved it – and of course the Oreos were a hit! I think this will be a regular in our family. How about you?

If you liked this recipe you might also like my Raspberry Frozen Yoghurt Bites or my Easy Peasy Strawberry Fro Yo Bites.

Like this post? Pin it!


Filed Under: Recipes

Easy Peasy Strawberry Fro Yo Bites

March 22, 2017 by Rosie 2 Comments

We are big fans of home made fro yo – it’s yummy and healthy too. What’s not to like?! Little M especially loves fro yo and since he doesn’t like to drink milk, it’s a good way of getting some dairy protein in him! I like making bite size fro yo, as it’s super easy to do – and fun for kids too.

I stumbled across a way to make these easy peasy fro yo bites by accident. Our supermarket delivery guy had brought strawberry yogurts instead of vanilla yoghurts – a lot of them! Although Little M will happily eat any flavour fro yo, he only likes plain or vanilla yoghurt. Which is fine by me, except I had a fridge full of strawberry yogurts!

So what did I do? I made them into the EASIEST strawberry fro yo bites ever! These fro yo bites are easy peasy!

The best part about these fro yo bites is that they only have THREE ingredients. PLUS – there is no pureeing, refreezing or general faffing about required! These are the perfect snack to make when you are short on time and they freeze really quickly.

Disclosure: Affiliates links are included. If you choose to buy through one of these links, I make a small commission. The price is the same. All opinions are my own. Thanks for your support!

All you need is a few fresh strawberries, a couple of strawberry yogurts and some granola! That’s it! You could also make without the fresh strawberries, but I think they are nicer with. If you don’t have any granola you could use crushed graham crackers or wholewheat biscuits instead.

You’ll also need a ice cube tray, or silicone mould. I decided to use a small easter egg tray to make some egg shaped fro yo bites! You can make any shape you like. As we all know – kids love novelty shaped things!

Simply slice the strawberries and put a small piece into each space in your mould. Fill with strawberry yogurt, almost to the top. Finally sprinkle with granola. Freeze for around an hour. Done!

Carefully release the fro yo bites from the mould. Let stand for 5 minutes to soften – if you can wait that long!

The verdict from the kids? Both my kids gobbled these down and Little M said it was the best fro yo he had ever tasted! (I have a feeling he says that every time…)

Do give them a try and let me know what you think!

Print Recipe
Easy Peasy Strawberry Fro Yo Bites
The easiest strawberry fro yo bites you will ever make! These yummy bites only have THREE ingredients. They are quick to make, yummy and healthy too. Perfect for kids snacks!
Prep Time 5 minutes
Passive Time 1 hour
Servings
bites
Ingredients
  • 3 Strawberries
  • 2 small pots Strawberry yoghurt We used regular strawberry yogurt. You could also use low fat yoghurt or creamy greek yoghurt.
  • 1/2 cup Granola Or you could use crumbled graham crackers or wholewheat biscuits.
Instructions
  1. Slice the strawberries into small pieces. Place a small piece in the bottom of each space in your mould.
  2. Fill each space in the mould almost to the top with strawberry yoghurt.
  3. Top each space with granola.
  4. Freeze for around an hour or until firm.
  5. Release carefully from mould. Let soften for a few minutes before eating!
Recipe Notes

Try making these in different shaped trays or moulds for extra fun!

Share this Recipe

Like this post? Pin me!


Filed Under: Crafts and Activities, Recipes

How to Make Easy Layered Chocolate Hearts

February 1, 2017 by Rosie 7 Comments

Are you looking for a quick and easy treat to make for Valentines day? Perhaps something the kids can make?

These easy layered chocolate hearts are so simple to make and a fun activity for kids too. We used these as a cool opportunity to learn about chocolate melting – it melts into a liquid when it gets hot, but turns back into a solid when it cools down. So it’s really a science experiment too!!! If that isn’t a good enough excuse to make (and eat!) chocolates, then I don’t know what is!

You can make these with your kids, or make some for them as a valentines treat. They also make cute gifts in a heart shaped container or paper bag.

All you need is a couple of bars of chocolate, some mini m & m’s and a heart shaped ice cube tray. You could also use regular size m&m’s crushed up – or any other small candies. Feel free to also make these in any other shape you fancy – go wild!

You basically melt milk and white chocolate and layer the chocolate and m&m’s together. You can of course melt chocolate in the microwave, but I think it is more fun for kids to watch the chocolate melting. Up to you!

When layering the hearts (if you trust your kids to not eat all of the ingredients!) you can just give them the spoons and let them get on with it!

Here’s the recipe…

Print Recipe
Easy Layered Chocolate Hearts
These easy layered chocolate hearts are so simple to make and a fun activity for kids too.
Prep Time 10 minutes
Passive Time 30 minutes
Servings
chocolates
Ingredients
  • 1 125g bar Milk Chocolate (or you can use dark)
  • 1 125g bar white chocolate
  • 1 bag mini m&m's
Prep Time 10 minutes
Passive Time 30 minutes
Servings
chocolates
Ingredients
  • 1 125g bar Milk Chocolate (or you can use dark)
  • 1 125g bar white chocolate
  • 1 bag mini m&m's
Instructions
  1. Break up the milk chocolate and place in a glass bowl.
  2. Place glass bowl on top of a pan of boiling water on the stove. Heat gently and stir to melt the chocolate. You can also melt in the microwave, but I think it is more fun for kids to watch the chocolate melting. Up to you! Make sure you keep small children a safe distance away from the stove and the boiling water.
  3. Allow chocolate to cool for 2 or 3 minutes, until bowl is safe to touch. Place on the table, along with the mini m&m's, some teaspoons (or baby spoons work well!) and the clean and dried ice cube tray.
  4. Put a few mini m&m's in the bottom of each of the hearts. Then use the teaspoons to put a layer of chocolate on top. Continue in all of the hearts until you have used all of the chocolate.
  5. Repeat a second layer of m&m's, so that the hearts are about half full. When layering the hearts (if you trust your kids to not eat all of the ingredients!) you can just give them the spoons and let them get on with it! They might choose to do their layers in a different way!
  6. Place the hearts in the fridge for around 10 - 15 minutes or until it starts to harden.
  7. While you are waiting, repeat the melting process for the white chocolate.
  8. Take the chocolates out of the fridge and top with a layer of white chocolate. You can place some more m&m's on top if you like.
  9. Put the chocolates back in the fridge for another 15 minutes or so until they have hardened. You can also just leave them in a cool area to harden, although they will take longer.
  10. When the chocolate has hardened, gently press the hearts out of the tray. Place in a special tray, gift box or bag ready for Valentines Day!
Recipe Notes

Make sure you keep small children a safe distance away from the stove and the boiling water.

Note that the milk chocolate sometimes gets a little white after a day or so due to the melting process - but it tastes just as yummy!

Share this Recipe

Place your chocolates in a special tray, gift box or bag ready for Valentines Day!

If you like these then you might also like my Raspberry Frozen Yoghurt Bites.

Disclosure: Affiliates links are included for your convenience. If you choose to buy through one of these links, I make a small commission. The price is the same. All opinions are my own. Thanks for your support!

Like this idea? Pin me!


Filed Under: Crafts and Activities, Recipes

Easy Chocolate Penguin Cookies

December 23, 2016 by Rosie 1 Comment

Are you looking for a quick and easy cookie recipe? These easy chocolate penguin cookies are so quick and simple to make. They are perfect if you are looking for something easy to make with the kids over the holidays, or a quick homemade gift.

easy-chocolate-penguin-cookies-3

These cute penguins are fun for Christmas or all year round!

You can make these cookies with ingredients you’ll likely have in your kitchen already – over the holidays I’m sure there will be plenty of candies around to decorate them with!

The dough is fairly sticky to begin with. Use plenty of flour on your rolling surface and on the dough to make it easy to roll.

We used simple sugar icing with chocolate chips and m & m’s to decorate the cookies. Just give your kids some icing and candies and let them go wild!

easy-chocolate-penguin-cookies

easy-chocolate-penguin-cookies-2

As always the measurements are in cups, but I’ve also included metric for anyone who prefers. You’ll need a penguin cookie cutter, along with your ingredients!

Here’s the recipe…

Print Recipe
Easy Chocolate Penguin Cookies
Easy chocolate penguin cookies. Perfect if you are looking for something easy to make with the kids over the holidays, or a quick homemade gift.
Prep Time 20 minutes
Cook Time 8 minutes
Passive Time 2 hours
Servings
cookies
Ingredients
  • 1 1/2 cups all purpose flour
  • 3/4 cups cocoa powder
  • 1 1/4 teaspoon baking powder
  • 3/4 cup butter
  • 1 1/4 cup white sugar
  • 1 egg
  • 1 tsp vanilla essence
  • 1/2 cup chocolate chips for the penguin's eyes!
  • 1 cup m & m's for beaks, waistcoat buttons etc.
Instructions
  1. Have all ingredients at room temperature. Sieve the flour cocoa powder and baking powder into a mixing bowl.
  2. Cream together the butter and sugar in a separate bowl. Stir in the egg and vanilla essence.
  3. Mix together the wet and dry ingredients to form a dough.
  4. Wrap cookie dough in food wrap and place in the fridge for 2 hours.
  5. Preheat the oven to 375 degrees F (190 degrees C). Roll out the cookie dough on a floured surface, to around 1/4 inch in thickness. Add more flour as needed. Dough is sticky, so you can add plenty of flour without fear of the dough drying out.
  6. Use penguin cutter to cut cookie shapes and place on a greased baking tray.
  7. Bake for 8-10 minutes.
  8. Allow to cool for a few minutes before transferring to a wire rack to cool fully.
  9. For the icing, simply mix 1 cup icing/powdered sugar with 4 tbs of milk. We just used a spoon to ice, but you could also use an icing bag - or a food bag with the corner snipped off!
  10. Add icing and candies to your cookies. Allow to dry.
Recipe Notes

Dough is sticky so use plenty of flour when rolling out.

Try cutting orange M & M's in half to make cute beaks!

Share this Recipe

Yum! We hope you enjoy making these penguins as much as we did!

Like this recipe idea? Pin me!

easy-chcolate-penguin-cookies-pin

Filed Under: Christmas, Crafts and Activities, Recipes

How to Make Christmas Pudding Rice Crispy Cakes

November 25, 2016 by Rosie 4 Comments

Christmas Pudding Rice Crispy Cakes

Are you looking for a super easy Christmas treat to make? These Christmas Pudding Rice Crispy Cakes are easy peasy to make, even with the kids! An easy, yet festive treat for parties and holiday fairs, they also taste chocolatey and yummy!

christmas-pudding-rice-crispy-cakes

For those American readers who don’t know what Christmas Pudding is – it’s a traditional English rich fruit pudding served at Christmas. It’s called Plum Pudding in the US. This is my Rice Crispy Cake version!

You can add almonds, raisins, or both if you like, or keep them simple with just chocolate. You can vary the type of chocolate – try dark, or even white chocolate!

I love the marzipan decorations and think they are worth the extra bit of effort. Marzipan just seems to complete any festive treat, don’t you think? I love it! But if you can’t eat nuts, or prefer a simpler option, you can use roll out icing, or use ready made cake decorations.

christmas-rice-crispy-cakes-3

You basically just melt the chocolate and stir in the rice crispies, raisins and almonds. Easy peasy! Divide into the cases and put in the fridge to harden before decorating.

I made the marzipan decorations by doing a quick bit of moulding by hand and using a knife to add any finishing touches. You could also use a mini leaf mold to make this quick and easy. I love the idea of these!

Here’s the recipe…

Print Recipe
Christmas Pudding Rice Crispy Cakes
Super easy Christmas Pudding Rice Crispy Cakes. An easy, festive treat for parties and holiday fairs.
Prep Time 30 minutes
Servings
cakes
Ingredients
  • 7 Oz (200g) Milk Chocolate Try 2 bars of 3.5 ounce Cadbury chocolate!
  • 2.5 Cups Rice Crispies
  • 1 Handful Chopped Almonds Optional
  • 1 Handful Raisins Optional
  • 1 Pack Marzipan
  • Red and Green Food Colouring
Prep Time 30 minutes
Servings
cakes
Ingredients
  • 7 Oz (200g) Milk Chocolate Try 2 bars of 3.5 ounce Cadbury chocolate!
  • 2.5 Cups Rice Crispies
  • 1 Handful Chopped Almonds Optional
  • 1 Handful Raisins Optional
  • 1 Pack Marzipan
  • Red and Green Food Colouring
Instructions
  1. Line a cake tin with 12 cupcake liners.
  2. Melt the chocolate in a heat proof bowl over a saucepan or in the microwave.
  3. Stir in the rice crispies, plus raisins and almonds if using.
  4. Place in the fridge for 20 minutes, or until the chocolate hardens. Remove from fridge and set aside.
  5. Mould marzipan into holly leaves and berries. Place onto a greaseproof lined board. Paint with food colouring and allow to air dry for around an hour.
  6. Place marzipan decorations onto cakes. Gently press to hold in place.
Recipe Notes

Use a small clean paint brush to colour the marzipan. Make sure it is fully dry before sticking to the cakes.

Share this Recipe
 

Do you have any festive recipes planned? What are you going to make?

Like this recipe? Pin me!

You Baby Me Mummy

Filed Under: Christmas, Recipes Tagged With: chocolate, Christmas Pudding, Festive, Rice Crispies

Primary Sidebar

  • Email
  • Facebook
  • Instagram
  • Pinterest
  • RSS
  • Twitter

Hi, I’m Rosie!

Lover of tea on the beach and avid recycler!

I’m here to help you, with sweet and simple ideas to inspire your children.

Art, crafts, creative play and a splash of nature. Let’s get creative, the simple way!

Take a look around…

Popular Posts

Give us a Like!

Tweet with me!

littlefishblog Follow

Avatar
now

Reply on Twitter Retweet on Twitter Like on Twitter Twitter
Load More

We’re on Pinterest too!

Member of:

Footer

Follow us on Instagram

littlefishblog

littlefishblog
May her kindness and calm presence live on within May her kindness and calm presence live on within us all. 💕Rest in peace your majesty 👑 

I love this photo that my dad @screen_play captured in the 1980’s. A happy, magical moment 💫 

#queenelizabeth #hrh
Easy Washi Tape Hearts! 🥰 ⠀⠀⠀⠀⠀⠀⠀ Easy Washi Tape Hearts! 🥰
⠀⠀⠀⠀⠀⠀⠀⠀⠀
Would you like to make some last minute Valentines this weekend? ❤️(Or maybe you're stuck in isolating like us 🤪).
⠀⠀⠀⠀⠀⠀⠀⠀⠀
These easy washi tape hearts are so quick and easy to make - they look really effective too! 😍
⠀⠀⠀⠀⠀⠀⠀⠀⠀
I've posted a blog post (link in bio) but to be honest these are so simple to make.
⠀⠀⠀⠀⠀⠀⠀⠀⠀
•Cut a heart shape from card - you could use an old piece of cereal box.
⠀⠀⠀⠀⠀⠀⠀⠀⠀
•Tear pieces of washi tape and create a collage. See what mix of patterns and colours you can make!
⠀⠀⠀⠀⠀⠀⠀⠀⠀
•Add a face with a black pen or goggly eyes.
⠀⠀⠀⠀⠀⠀⠀⠀⠀
•Write a note on the back for someone special!
⠀⠀⠀⠀⠀⠀⠀⠀⠀
If you don't have any washi tape you could also use left over pieces of gift wrap and stick on with glue. 🎁 
⠀⠀⠀⠀⠀⠀⠀⠀⠀
Are you giving Valentines on Monday? Are you making anything special with the kids?
Who loves a good 'ole recycled toilet roll craft?! Who loves a good 'ole recycled toilet roll craft?!
⠀⠀⠀⠀⠀⠀⠀⠀⠀
I think the best Christmas decorations are the homemade ones, how about you? 🎄 
⠀⠀⠀⠀⠀⠀⠀⠀⠀
Toilet roll crafts are one of our faves as you don't need much to make them - it also reuses those cardboard tubes!
⠀⠀⠀⠀⠀⠀⠀⠀⠀
These Santa Claus and Mrs Claus toilet roll ornaments are really easy to make with just a few materials. Inspire children to make their own Santa 🎅 or Mrs Claus 🤶 - or perhaps they might decide to make their own Christmas characters!
⠀⠀⠀⠀⠀⠀⠀⠀⠀
Do your kids like to make homemade Christmas ornaments?
Hello!👋 Rosie here! It’s been a while! How Hello!👋 

Rosie here! 
It’s been a while! How was your summer? I hope you had a break from routine?

I took a social media break so I could focus on just ‘being’ this summer. It’s been a challenging year for us all and sometimes it’s good to take a step back and focus on what matters. ❤️

I love this photo of me and my gang (we are about to go on a pony trek!) 🐎 It sums up our summer - getting outdoors, trying new things and most of all, spending time together. 🥰

I also wholeheartedly recommend a visit to @pembreycountrypark in Wales 🏴󠁧󠁢󠁷󠁬󠁳󠁿 where this picture was taken. We loved it so much we could have spent much more than a day there!

Did you have a break from routine this summer? What did you get up to?
What can you create with a wooden spoon?!
⠀⠀⠀⠀⠀⠀⠀⠀⠀
We've had a go at making some wooden spoon people puppets! 
⠀⠀⠀⠀⠀⠀⠀⠀⠀
These were so fun and easy to make. Your children can use their imagination to create any different characters that they like! 
⠀⠀⠀⠀⠀⠀⠀⠀⠀
Some of the ideas my kids came up with were: mermaids, ladies with pretty dresses and super heroes. Scroll to see some of the finished results!
⠀⠀⠀⠀⠀⠀⠀⠀⠀
I hope your children have as much fun making these wooden spoon people puppets are much as mine did. Once you’ve made your puppets you can go ahead and put on a puppet show!
⠀⠀⠀⠀⠀⠀⠀⠀⠀
Click on the link in my bio for the full tutorial.
⠀⠀⠀⠀⠀⠀⠀⠀⠀
Have you used wooden spoons for your kids to craft with? What did you make?
Stick Fairy! 🧚‍♀️ I put this on my stor Stick Fairy! 🧚‍♀️ 

I put this on my stories, but then thought was too cute to not share properly! 💚

This wonderful stick fairy idea came from @mothernatured 👏 
I made one for the woodland playgroup I co-run and the children loved making their own versions! 💚

I recommend using dry sticks. Use pva glue and leave to dry thoroughly. Some of our group also found tying leaves on with yarn worked really well too!

Do you like to make nature crafts with your kids? 🌲
Spring is finally in the air! Hop little bunnies! Spring is finally in the air! Hop little bunnies! 🐇 
⠀⠀⠀⠀⠀⠀⠀⠀⠀
Do you have a Peter Rabbit fan in your house? My daughter adores the Peter Rabbit books and the tv show. How about your children? 🥕 
⠀⠀⠀⠀⠀⠀⠀⠀⠀
We love making our own toys from recycled bits and bobs in the house, so decided to have a go at making a Peter Rabbit figure using a toilet roll! ✂️ 

You can make this Peter Rabbit toilet roll DIY with an empty toilet roll and a few bits and pieces from the craft box.
⠀⠀⠀⠀⠀⠀⠀⠀⠀
Do you like making recycled crafts? Does it feel like spring where you are? 🌸
Happy Mother’s Day to all those celebrating this Happy Mother’s Day to all those celebrating this weekend. 🥰🌸
⠀⠀⠀⠀⠀⠀⠀⠀⠀
We love using washi tape in crafts, especially homemade cards. It’s so fun and easy to use and looks really effective. Why not give it a try? 
⠀⠀⠀⠀⠀⠀⠀⠀⠀
You can make these washi tape cards for any occasion. Your kids will enjoy coming up with their own designs. Search ‘washi tape cards’ on the blog for full tutorial.
⠀⠀⠀⠀⠀⠀⠀⠀⠀
Have you used washi tape in kids art and crafts? 👩‍🎨
Load More... Follow on Instagram

Disclaimer

This site is for information purposes. Please use your own judgement as to the suitability of each activity for your child.

Disclosure

As an Amazon Associate I earn from qualifying purchases.

Please see my full Disclosure and Privacy Policy for more information.

Copyright © 2025 Little Fish on the Foodie Pro Theme