• Skip to primary navigation
  • Skip to main content
  • Skip to primary sidebar
  • Skip to footer

Little Fish

  • Home
  • About
    • Work with Me
    • Contact
    • Disclosures
  • Crafts and Activities
    • Easy Arts and Crafts
    • Creative Play
    • Sea Themed Activities
    • Books and Activities

Make Your Own Chocolate Surprise Eggs

March 20, 2015 by Rosie 4 Comments

Little M loves watching surprise egg videos on youtube, so this Easter I thought it would be fun to make him some chocolate surprise eggs of my own – to, well, surprise him with!

The eggs are surprisingly cheap and easy to make – plus you can personalise them however you like with your own choice of sweets, treats and decorations.

All of the materials are really easy to collect – the only thing that might take a little forward planning is to buy an easter egg mould, if you don’t already have one.
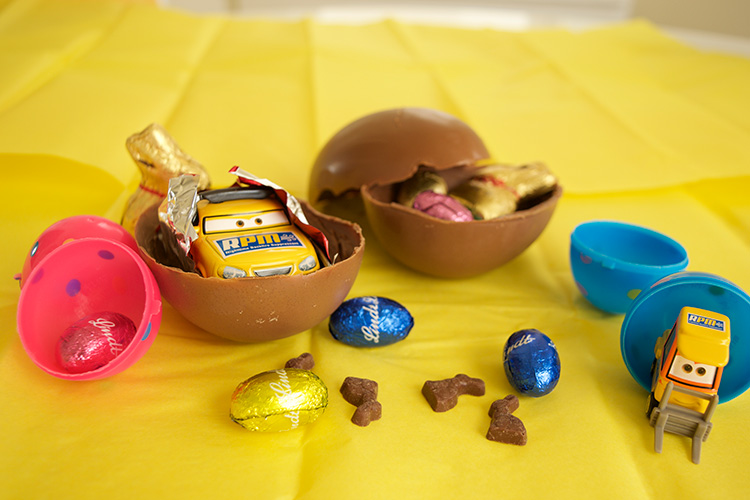
Surprise-eggs-opened.-jpg

These quantities will make one medium sized egg. You can easily adjust the quantities if your mould is larger or smaller than this, or if you wish to make several eggs!

Disclosure: This post contains affiliate links at no extra cost to you. Thank you for your support!

You will need:

  • 2 medium size Easter egg moulds (2 halves)
  • 125g (4.4oz) good quality milk chocolate (plain or white would work too)
  • *Assorted Easter treats for inside the egg – such as sweets, small chocolate eggs or small toys
  • Foil or tissue paper for wrapping
  • Optional: Sweets to decorate, plus a box and tissue paper to hold egg

*Choose treats based on the age of your child. For children under 4 go for soft chocolate eggs and bunnies, rather than hard shelled eggs that pose a choking hazard. If your child is older, you could place a toy inside, such as a diecast car or figurine – just like a real surprise egg! Just make sure it’s age appropriate for your child and is large enough to not pose a choking hazard. Always supervise your child when opening and eating the egg and always ensure that they open the egg first – before biting into it!

Also have ready:

  • Small spoon, pastry brush or clean paintbrush
  • Saucepan
  • Heatproof bowl
  • Wooden spoon
  • Foil or greaseproof paper
  • Chopping board

1. Break the chocolate into pieces and place in a heatproof bowl. Place the heatproof bowl over a pan of simmering water, making sure the bowl doesn’t touch the water. Gently melt the chocolate in the bowl.
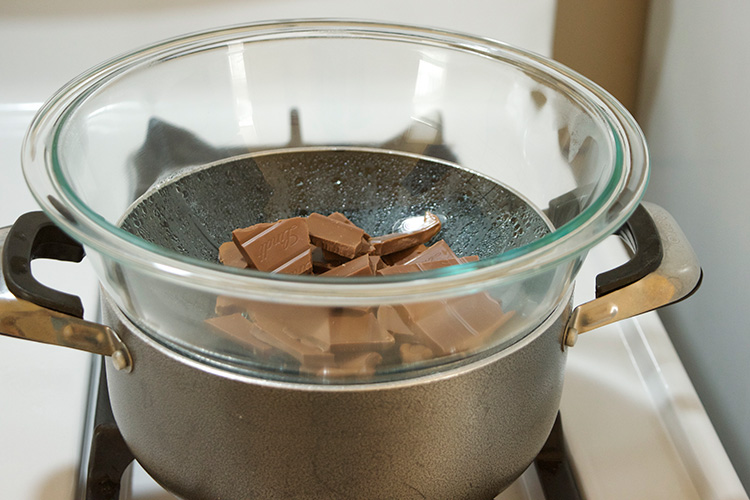
Chocolate-over-saucepan

2. Stir until smooth then take off the heat and leave to cool for a few minutes, but so the chocolate is still runny.
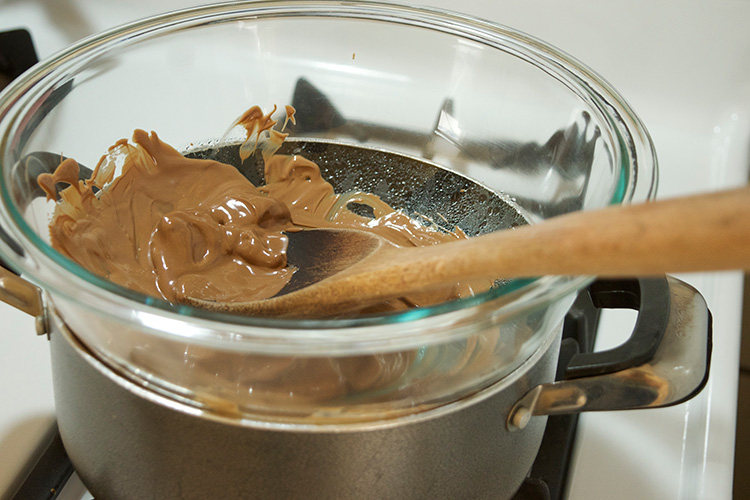
Melted-chocolate

3. Spoon about a quarter of the chocolate into one of the egg moulds and spread thickly over the inside with a pastry brush, clean paintbrush or small spoon. Cover the sides really well, as thicker sides make it easier to join the edges together later on. You can check that the chocolate is even by holding the mould up to the light.

4. Slowly swirl the chocolate round the egg mould to ensure an even coating. Continue to swirl the chocolate for around 10 minutes more until it has begun to set.
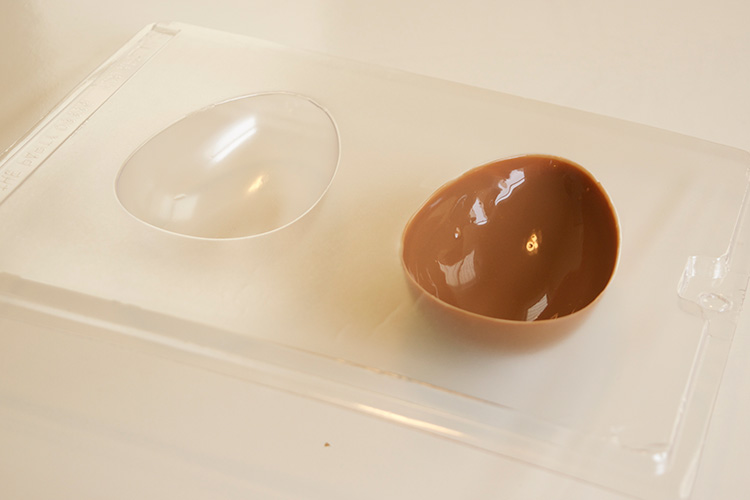
Filling-easter-egg-mould

5. Repeat with the other mould.

6. Place the moulds upside down on a tray or chopping board covered with foil or greaseproof paper. Refrigerate for around 30 minutes, or until firm. (Placing upside down ensures the chocolate does not pool in the bottom of the egg.)

7. Re-warm the remaining chocolate and repeat the process for each side of the mould, saving about 1 tbsp of chocolate for later. Use a knife to scrape away any excess around the rim of the mould to give a clean, straight edge.

8. Turn out each half onto a greaseproof paper or foil covered chopping board, carefully pulling away the mould until it releases itself.

9. Place one egg half carefully back in the mould, or in scrunched up foil, to hold it in place while you fill it with treats! (You can wear cotton or latex gloves if you want to avoid finger prints on the chocolate.)
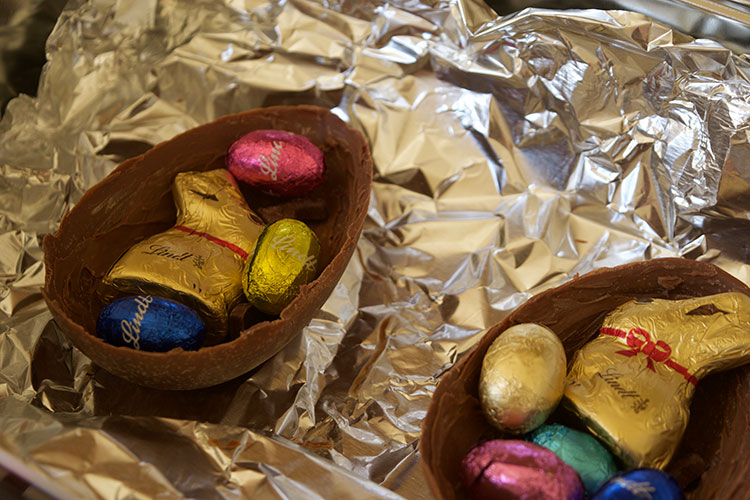
Filling-easter-eggs

10. Fill the egg half with your chosen treats and the small toy if using. You may wish to wrap the toy in paper or foil to protect it from the chocolate. (For babies or toddlers having their first taste of chocolate (!) you could leave out the treats all together and make a simple hollow egg.)
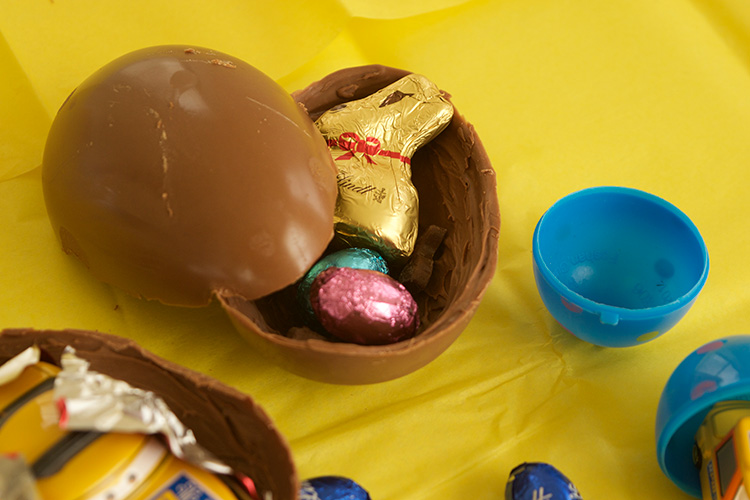
Filling-surprise-eggs

11. Warm the reserved chocolate and brush around the edge of the egg. Place the other half on top and press together. You can seal the join further by brushing with a little more chocolate and filling in any rough edges or holes. Leave in a cool place to set firm.

12. When firm carefully wrap the egg in foil. Or if you prefer you could decorate it and place it in a small tissue paper lined box. To decorate, use the paintbrush to dab a little chocolate onto the backs of sweets or chocolate buttons. Gently press them onto the egg.

Well done you just made a chocolate surprise egg! You can store your egg/s in an airtight container until needed. After a few days some discolouration of the chocolate is normal, as the fats and sugars change with the air temperature. This is harmless and does not affect the taste.

If you have smaller or larger moulds, you can easily adjust the chocolate quantity. You could even make a selection of different eggs for an Easter egg hunt!
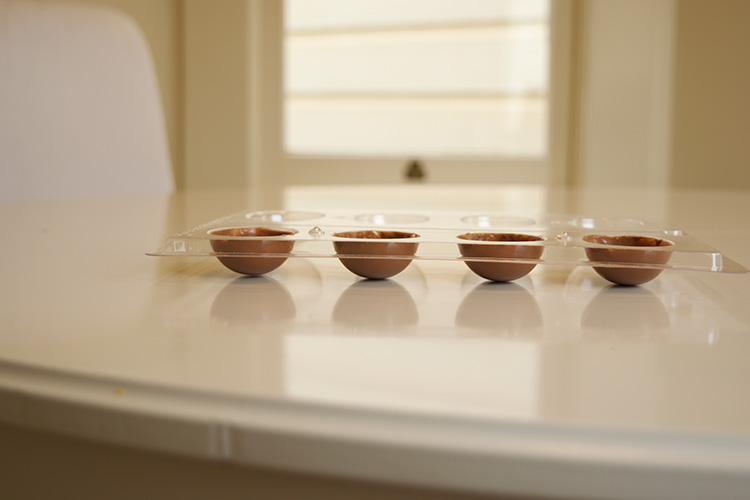
Small-easter-eggs

If you want to mix things up (or avoid your little one consuming too much chocolate) you could also fill some plastic eggs with toys or treats to add variety. With older children you could involve them in the making – perhaps making eggs for their friends or siblings.

Be as simple or as adventurous as you like – have fun!
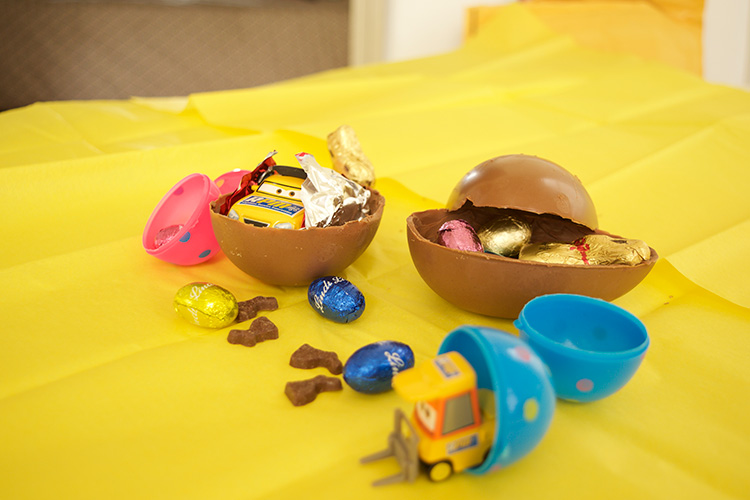
Opened-surprise-eggs2

Does your little one like surprise eggs? Do you have any other tips on making Easter eggs for children?

Like this post? Pin me!
You might also like...

  • Surprise Egg Activity Ideas for ToddlersSurprise Egg Activity Ideas for Toddlers
  • Easter Colouring Sheets – Free PrintablesEaster Colouring Sheets – Free Printables
  • 10 Magical Things to do with Your Kids10 Magical Things to do with Your Kids
  • Tips on Running with a StrollerTips on Running with a Stroller
Sharing is caring...Pin on Pinterest
Pinterest
29Share on Facebook
Facebook
0Tweet about this on Twitter
Twitter

Filed Under: Crafts and Activities, Easter, Preschooler, Recipes, Toddler Tagged With: chocolate, Easter, surprise egg

Previous Post: « 11/52 Giant Duplo Truck
Next Post: 12/52 Cars on Mosaic Tiles »

Reader Interactions

Comments

  1. Hannah Mums' Days

    March 26, 2015 at 7:55 pm

    This post is awesome!!! I want to make chocolate eggs and fill them with nice, unique things. What an ace idea…and I thought it was tricky to make choccy eggs, but this looks quite doable. The only thing I’d be nervous of, quite rightly, is breaking the eggs before anyone else got a look in!!
    Thanks for linking up to #TheList xxx

    Reply
  2. Rosie

    March 26, 2015 at 8:45 pm

    Thank you! Appreciated. Yes it’s surprisingly simple (and am all for simple!) I think the trick is to keep swirling the chocolate around until it begins to set, so it doesn’t all settle in the bottom. I like that you can personalise them however you like. Ha ha – yes, I think it’s inevitable that some chocolate consumption will be involved with this activity! 🙂

    Reply
  3. Charlotte @ Educating Elsa

    March 27, 2015 at 11:42 am

    Ahh this is brilliant! Elsa is addicted to those surprise eggs videos on YouTube (I don’t know why) so she would love her own to open! #TheList

    Reply
    • Rosie

      March 27, 2015 at 4:42 pm

      I know, Little M is the same – it’s a toddler addiction! I have to limit his surprise egg viewing, so it doesn’t become an out of control habit!

      Reply

Leave a Reply Cancel reply

Your email address will not be published. Required fields are marked *

Primary Sidebar

  • Email
  • Facebook
  • Instagram
  • Pinterest
  • RSS
  • Twitter

Hi, I’m Rosie!

Lover of tea on the beach and avid recycler!

I’m here to help you, with sweet and simple ideas to inspire your children.

Art, crafts, creative play and a splash of nature. Let’s get creative, the simple way!

Take a look around…

Popular Posts

  • Make a Seahorse Hobby Horse (With Things You Have At Home)Make a Seahorse Hobby Horse (With Things You Have At Home)
  • Make a Dinosaur Habitat Box (with Things You Have at Home)Make a Dinosaur Habitat Box (with Things You Have at Home)
  • Plesiosaur Painted Rock CraftPlesiosaur Painted Rock Craft
  • Santa Claus and Mrs Claus Toilet Roll OrnamentsSanta Claus and Mrs Claus Toilet Roll Ornaments
  • 15 Whale Themed Arts and Crafts for Kids15 Whale Themed Arts and Crafts for Kids

Give us a Like!

Tweet with me!

littlefishblog Follow

Avatar
now

Reply on Twitter Retweet on Twitter Like on Twitter Twitter
Load More

We’re on Pinterest too!

Member of:

Footer

Follow us on Instagram

littlefishblog

littlefishblog
May her kindness and calm presence live on within May her kindness and calm presence live on within us all. 💕Rest in peace your majesty 👑 

I love this photo that my dad @screen_play captured in the 1980’s. A happy, magical moment 💫 

#queenelizabeth #hrh
Easy Washi Tape Hearts! 🥰 ⠀⠀⠀⠀⠀⠀⠀ Easy Washi Tape Hearts! 🥰
⠀⠀⠀⠀⠀⠀⠀⠀⠀
Would you like to make some last minute Valentines this weekend? ❤️(Or maybe you're stuck in isolating like us 🤪).
⠀⠀⠀⠀⠀⠀⠀⠀⠀
These easy washi tape hearts are so quick and easy to make - they look really effective too! 😍
⠀⠀⠀⠀⠀⠀⠀⠀⠀
I've posted a blog post (link in bio) but to be honest these are so simple to make.
⠀⠀⠀⠀⠀⠀⠀⠀⠀
•Cut a heart shape from card - you could use an old piece of cereal box.
⠀⠀⠀⠀⠀⠀⠀⠀⠀
•Tear pieces of washi tape and create a collage. See what mix of patterns and colours you can make!
⠀⠀⠀⠀⠀⠀⠀⠀⠀
•Add a face with a black pen or goggly eyes.
⠀⠀⠀⠀⠀⠀⠀⠀⠀
•Write a note on the back for someone special!
⠀⠀⠀⠀⠀⠀⠀⠀⠀
If you don't have any washi tape you could also use left over pieces of gift wrap and stick on with glue. 🎁 
⠀⠀⠀⠀⠀⠀⠀⠀⠀
Are you giving Valentines on Monday? Are you making anything special with the kids?
Who loves a good 'ole recycled toilet roll craft?! Who loves a good 'ole recycled toilet roll craft?!
⠀⠀⠀⠀⠀⠀⠀⠀⠀
I think the best Christmas decorations are the homemade ones, how about you? 🎄 
⠀⠀⠀⠀⠀⠀⠀⠀⠀
Toilet roll crafts are one of our faves as you don't need much to make them - it also reuses those cardboard tubes!
⠀⠀⠀⠀⠀⠀⠀⠀⠀
These Santa Claus and Mrs Claus toilet roll ornaments are really easy to make with just a few materials. Inspire children to make their own Santa 🎅 or Mrs Claus 🤶 - or perhaps they might decide to make their own Christmas characters!
⠀⠀⠀⠀⠀⠀⠀⠀⠀
Do your kids like to make homemade Christmas ornaments?
Hello!👋 Rosie here! It’s been a while! How Hello!👋 

Rosie here! 
It’s been a while! How was your summer? I hope you had a break from routine?

I took a social media break so I could focus on just ‘being’ this summer. It’s been a challenging year for us all and sometimes it’s good to take a step back and focus on what matters. ❤️

I love this photo of me and my gang (we are about to go on a pony trek!) 🐎 It sums up our summer - getting outdoors, trying new things and most of all, spending time together. 🥰

I also wholeheartedly recommend a visit to @pembreycountrypark in Wales 🏴󠁧󠁢󠁷󠁬󠁳󠁿 where this picture was taken. We loved it so much we could have spent much more than a day there!

Did you have a break from routine this summer? What did you get up to?
What can you create with a wooden spoon?!
⠀⠀⠀⠀⠀⠀⠀⠀⠀
We've had a go at making some wooden spoon people puppets! 
⠀⠀⠀⠀⠀⠀⠀⠀⠀
These were so fun and easy to make. Your children can use their imagination to create any different characters that they like! 
⠀⠀⠀⠀⠀⠀⠀⠀⠀
Some of the ideas my kids came up with were: mermaids, ladies with pretty dresses and super heroes. Scroll to see some of the finished results!
⠀⠀⠀⠀⠀⠀⠀⠀⠀
I hope your children have as much fun making these wooden spoon people puppets are much as mine did. Once you’ve made your puppets you can go ahead and put on a puppet show!
⠀⠀⠀⠀⠀⠀⠀⠀⠀
Click on the link in my bio for the full tutorial.
⠀⠀⠀⠀⠀⠀⠀⠀⠀
Have you used wooden spoons for your kids to craft with? What did you make?
Stick Fairy! 🧚‍♀️ I put this on my stor Stick Fairy! 🧚‍♀️ 

I put this on my stories, but then thought was too cute to not share properly! 💚

This wonderful stick fairy idea came from @mothernatured 👏 
I made one for the woodland playgroup I co-run and the children loved making their own versions! 💚

I recommend using dry sticks. Use pva glue and leave to dry thoroughly. Some of our group also found tying leaves on with yarn worked really well too!

Do you like to make nature crafts with your kids? 🌲
Spring is finally in the air! Hop little bunnies! Spring is finally in the air! Hop little bunnies! 🐇 
⠀⠀⠀⠀⠀⠀⠀⠀⠀
Do you have a Peter Rabbit fan in your house? My daughter adores the Peter Rabbit books and the tv show. How about your children? 🥕 
⠀⠀⠀⠀⠀⠀⠀⠀⠀
We love making our own toys from recycled bits and bobs in the house, so decided to have a go at making a Peter Rabbit figure using a toilet roll! ✂️ 

You can make this Peter Rabbit toilet roll DIY with an empty toilet roll and a few bits and pieces from the craft box.
⠀⠀⠀⠀⠀⠀⠀⠀⠀
Do you like making recycled crafts? Does it feel like spring where you are? 🌸
Happy Mother’s Day to all those celebrating this Happy Mother’s Day to all those celebrating this weekend. 🥰🌸
⠀⠀⠀⠀⠀⠀⠀⠀⠀
We love using washi tape in crafts, especially homemade cards. It’s so fun and easy to use and looks really effective. Why not give it a try? 
⠀⠀⠀⠀⠀⠀⠀⠀⠀
You can make these washi tape cards for any occasion. Your kids will enjoy coming up with their own designs. Search ‘washi tape cards’ on the blog for full tutorial.
⠀⠀⠀⠀⠀⠀⠀⠀⠀
Have you used washi tape in kids art and crafts? 👩‍🎨
Load More... Follow on Instagram

Disclaimer

This site is for information purposes. Please use your own judgement as to the suitability of each activity for your child.

Disclosure

As an Amazon Associate I earn from qualifying purchases.

Please see my full Disclosure and Privacy Policy for more information.

Copyright © 2025 Little Fish on the Foodie Pro Theme